Explore the world of Concorde with Heritage Concorde
Landing light project
As part of our work on G-AXDN at Duxford we offered to restore the landing lights back to working order on the aircraft, with the complete agreement of the aircrafts owners (Duxford Aviation Society) the work commenced in February 2015.

Avionics engineer John Dunlevy takes a look at the screws to remove the first lamp and motor.

Avionics engineer John Dunlevy starts removing the screws that have not been moved in 38 years
The landing light system works off both 115v 400hz and 28v systems, the difficult system to restore would be the 115v 400hz lights. It was decided very early on that it would not be good to use 115v for two reasons
1 - Cost of converting 240v (or 28v) to 115v 400hz
2 - Safety of having 115v running through the aircraft while visitors were on the aircraft.
We therefore decided that the lighting system that worked from 115v should be converted to a lower and safer 24v system.

The main landing lights extend and retract from the body of the fuselage of the aircraft by means of a 115v 400hz motor, the bulb in the landing light is a 600w 28v par 64 lamp.
The transformer for the lamp is attached to the lamp motor fitting
Inside the wiring box for the lamp (on G-AXDN) are two relays and one bridge rectifier.
In order to convert the system to 24v operation we would use most of the existing circuit but bypass the transformer and convert the entire system to 24v.
Right you can see a circuit diagram for the lighting system. (Production aircraft drawing)
To convert the system to 24v we would need to source 4 24v motors and convert the bulbs to LED
NOTE. LED conversion is due to the existing lamps being extremely high wattage, the heat and light generated would be excessive for display purposes.
We would also need to do some modification to the wiring inside the light units to make a DC motor work on the system.
Because we are using the aircrafts original systems to power and operate the lights we do not need to change wiring to and from the light units themselves.


John Dunlevyopens the panel to inspect the lighting unit.

Inspection of the pins to the lighting unit (G-AXDN was outside for 20 years the wiring is in A1 condition)


Closeup of the gold plated wiring connectors
Light unit prior to removal
We inspect the connections to the lighting unit and find the connections are in A1 condition, there is some minor corrosion to the housing of the unit but this is very minor.
The unit is removed for conversion and fitting once complete.
We also take a look at the landing bay to see how accessible the land/taxi lights are, these are attached to the front landing gear bay doors.

Land/Taxi lights inside the front landing gear bay doors

The modification to the lights has been done and we move on to the landig gear bay door lights, to do the modification we have to open the gear bay doors, this has not ever been done on AXDN since the aircraft was in service. We have trouble finding the manual release because it is under the observers station in the floor of the aircraft covered in dust and various rubbish dropped by visitors during the 38 years of display at Duxford.
We find the manual release and use it to open the gear bay doors, WOW what a sight.
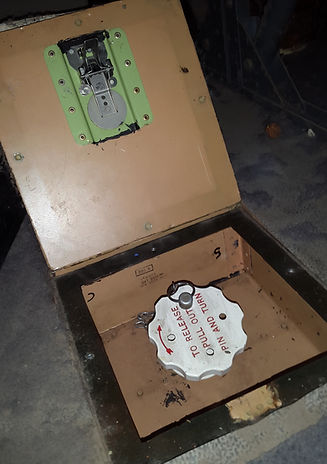

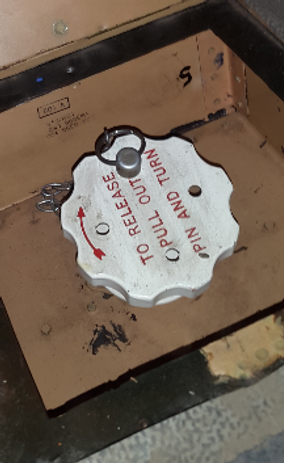
Above; the manual release handle which we uncover under the observers station inside the cabin on AXDN


Above & Left; the doors glide open
Right you can see the video of the doors opening, yes I did jump when the first lock was released!
You can hear the sound of the M2V fluid being dumped out of the side of the aircraft to empty the actuators as the doors open, this is normal and expected, we had a spill kit ready.
The doors glided open perfectly, with no weight of the landing gear to push them open they did not open fully but again this was expected.
We remove the covers off the door lights and remove the light units for modification.
Although the covers are dirty, the actual landing light units are in great condition.


The Modificaion
The modification is fairly simple in that we are replacing the 115v motors for 24v ones. We have used low current motors which consume well less than 1 amp when in operation. The motors are 5000 RPM like the originals and are unbraked. We are using most of the original components inside the light unit to retain as much as possible. The only thing to be removed is the actual motor itself and the bulb. A small wiring modification need to be done on each light.

Above & Right some of the pictures of the modification and inside the light unit


Once the modification is done we replace each light and test the system, it works perfectly! We will move onto the strobe system next.
Left you can see the lighting working, in addition you can see some of the additional work we are doing on G-AXDN