Explore the world of Concorde with Heritage Concorde
Concorde Nose and Visor operations

Above: The nose at 12.5 degrees for a landing enables the pilot to see the runway clearly
The high angle of attack on landing dictates the need for a moveable nose – a fixed one would completely obscure the runway, as the available downward view to the pilot would be only about 5 degrees. So the nose, which must form a streamlined shape for supersonic flight, has to droop for landing.
There are in fact, four positions of the combined visor and nose. Three of them are used on every flight.
The nose and visor are fully up at all speeds above the indicated airspeed of 250 knots, which is about equal to 290 miles per hour. The visor alone can be lowered (it slides down and forward into a recess in the nose), but this position is seldom used, except at a transit stop, when the windscreen needs cleaning.
During take-off and Landing the nose fairing and the visor, which it houses, are lowered (or drooped) to improve the pilots’ field of vision.
In flight, the nose and visor are raised to present clean aerodynamic lines; the visor also protects the windshield from extreme frictional heating. The visor is secured by bolts to a hydraulically operated mechanism that raises and lowers the visor on rails housed within the nose fairing. It also has electrical connections which provide power for the visor window panel de-icing system.
There is a selector switch; this is for normal operation of the visor and droop nose. This selector switch, caption warning lights, magnetic indicators and a windshield wipers override switch are grouped together on the co-pilot’s dash panel. Use of the gated, normal system, switch progressively lowers and raises the visor and nose using power from the green hydraulic system and the normal and essential D.C. electrical supplies.
If the normal system should fail, the visor and nose can be lowered, but not raised, using the standby system powered by the yellow hydraulic system and the essential D.C. electrical supply. The standby control switches are located on the centre console and are set in a pivoted guard to prevent inadvertent operation and to ensure that they are used in correct sequence. Use of the standby switches isolates the normal system, lowers the visor, and releases the nose up locks and collet locks on the nose actuator to permit the nose to free-fall under its own weight and aerodynamic pressure.
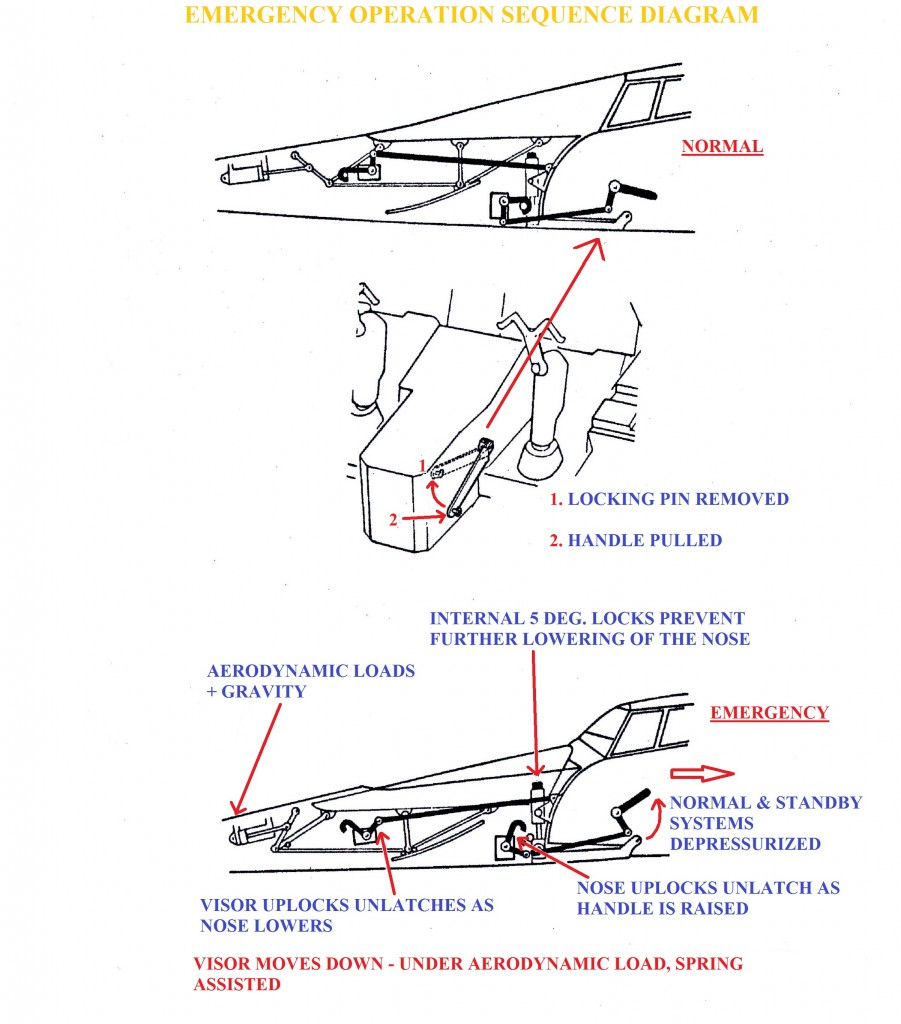
In the event of total hydraulic and/or electrical failure, the nose up locks can be released mechanically to permit the nose to free fall to the 5 deg. down position. As the nose lowers it automatically releases the visor up-lock and allows the visor to free fall.The audio warning sounds if the airspeed exceeds math 0.95 with the visor down or released from its up Lock, or if it exceeds 270 kt. when the nose is below 5 deg. The audio warning electrical circuits are connected via the visor up lock micro-switches and the nose transmitter unit
The nose fairing also accommodates the radome, the pitot heads and the ADC incidence sensors, the weather radar scanner and the No.1 DME aerial.
Below 250 knots the angle of attack is beginning to increase to about 7 degrees and the aircraft is also likely to be within the outer traffic pattern of an airfield. In the USA all aircraft flying below an altitude of 10,000 feet are required to fly at 250 knots or less, as they are within the area of light aircraft, moving at slower speeds can fly largely unrestricted.
To provide vision along the flight path, the nose is lowered to its 5 degrees position, giving a downward view of about 10 degrees.On landing, once the wheels are lowered, the nose is lowered all the way, producing the famous birdlike appearance we all know and love.

Above: Concorde G-BOAE looking birdlike while landing at Heathrow
Visor Mechanism
The visor is supported by a rigid framework of Legs and struts mounted on carriages that run on curved rails. When the visor and framework assembly is moved by the action of the hydraulic visor actuating jack and a hinged ‘A’ frame, the rails guide it to the raised or lowered position. The rails are supported by side brackets braced with adjustable struts, and have attachments that permit differential expansion to avoid distortion.
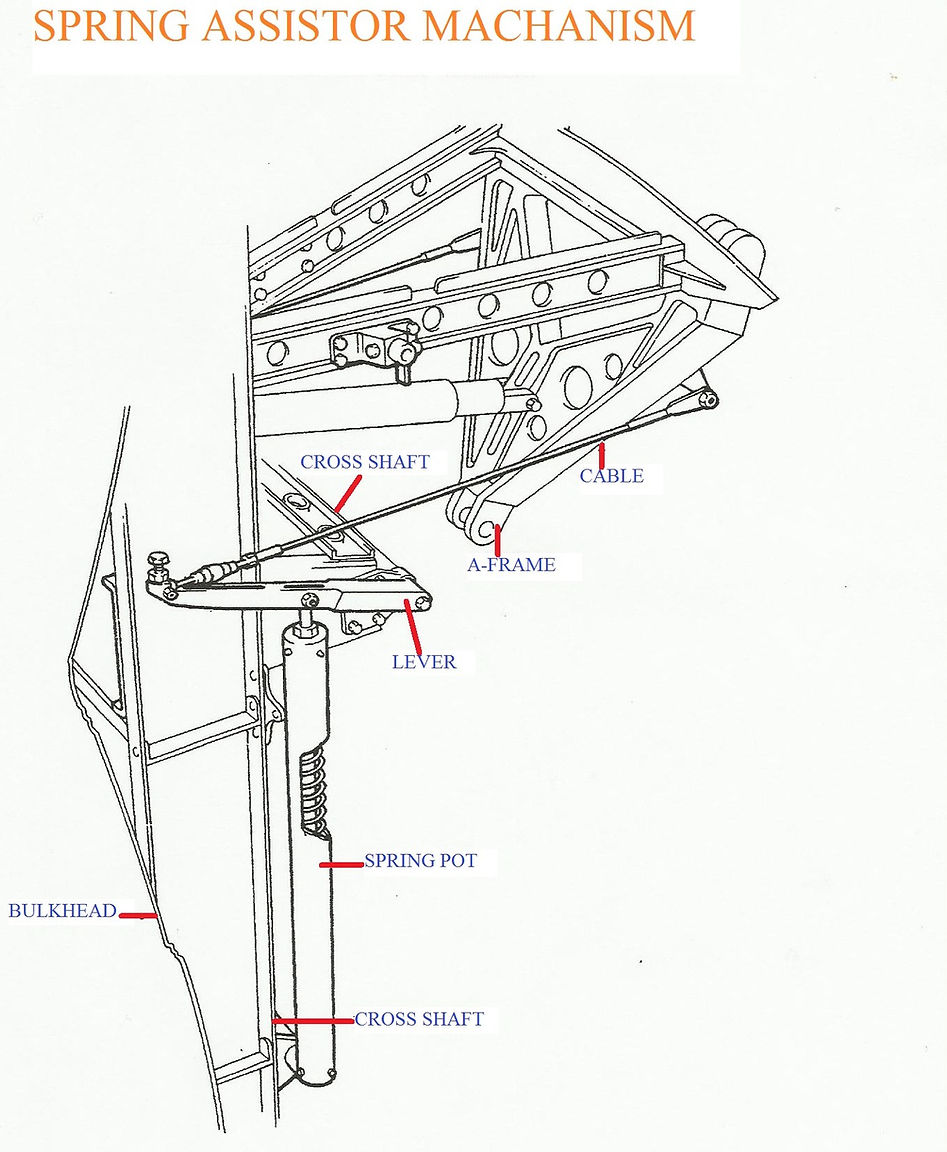
An up-lock secures the visor in the raised position, and a mechanical emergency release system is fitted to open the up-Lock in the event of hydraulic or electrical failure. A spring assisting mechanism aids free fall of the visor to the fully down position when the emergency release system is used. Visor Location fittings comprising of hooks and a roller on the visor and a stop pin assembly on the windshield frame engage during the final upward movement of the visor to retain the visor in its correct location with the windshield frame.

Visor Uplock
The visor up-lock is bolted to the mid bulkhead on the nose fairing. It comprises of self locking twin hooks with duplicate, interconnected toggle mechanisms, a hydraulic jack, and two microswitches (M32 and M37) for the visor and nose indication circuit.When the visor is not engaged in the up-locks, the up-lock hooks are held open by springs. When the visor is raised its locking rollers engage the hooks and rotate them to the locked position where each is secured by its spring loaded toggle mechanism.Extension of the jack trips the toggle mechanisms and the hooks are freed to release the visor. The toggle mechanisms are mechanically linked to the visor emergency release mechanism by a cam lever which also operates a striker arm for the left-hand microswitch. The right hand microswitch striker arm is operated by a striker on the visor locking rollers.

Visor spring assisting mechanism
The spring assisting mechanism consists of two spring-pots, levers and cables assembled on cross-shafts at the rear of the nose fairing forward bulkhead. The resultant spring-pot tension upon the A-frame to which the forward ends of the cables are attached, ensures that during operation of the emergency mechanical release system the visor will free fall to the lowered position and be retained there.
Visor Emergency Release
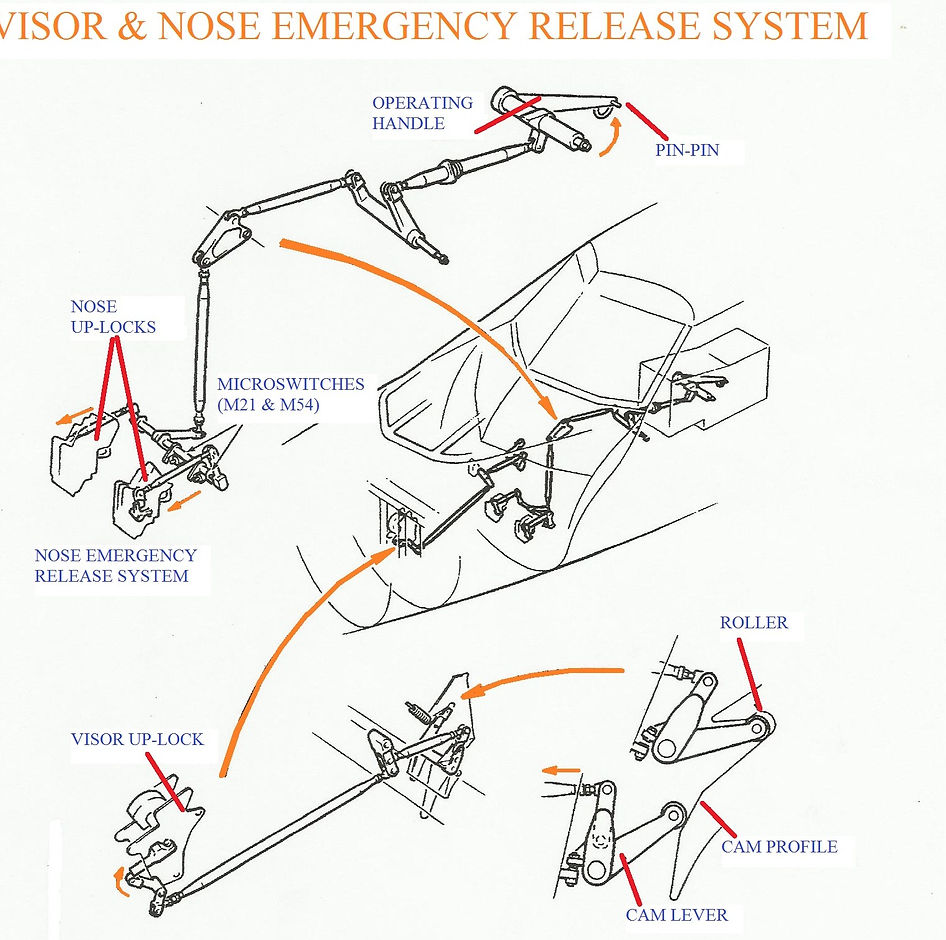
The emergency release system mechanically releases the visor up-lock in the event of normal and standby system failures. The system mechanism, consisting of connecting rods and levers, is tripped by a cam on the nose fuselage pressure bulkhead to release the visor up-lock during nose lowering.
Droop Nose Mechanism
The droop nose mechanism comprises the hinges about which the nose pivots, the guide rails and carriages, the side load links that take the lateral stresses imposed on the nose and the nose actuator jacks. All these units secure the nose to the fuselage. The nose, which is raised and lowered by the twin hydraulic actuator jacks, has three positions: up, intermediate (5 deg. down) and down (12 1/2 deg. down). The twin jacks provide a fail safe measure and ensure adequate damping during nose movement. In the raised position the nose is secured by twin nose up-locks; In the 5 deg. down and the fully lowered positions the nose is supported by the jacks.

Nose Up-Locks
The nose up-locks are bolted to the nose jacks trunnion members on the fuselage forward pressure bulkhead.
Each up Lock comprises a self-locking hook and its mechanism, a hydraulic jack for releasing the hook, and two microswitches for nose control and indication circuits.
The up-lock hook is held open by a light spring until the nose is raised, the nose fairing up-lock pin then engages the hook and rotates it to the locked position where it is secured by the spring loaded toggle mechanism.
To release the hook, the hydraulic jack is extended to trip the toggle mechanism; the nose is then free to droop.
The up-lock mechanism is mechanically linked to the nose emergency release lever which, when operated, trips the mechanism to free the hook.

Nose position transmitter unit
The nose position transmitter is positioned on the floor of the forward fuselage equipment bay, above the droop nose left-hand hinge arm. It provides information on the position of the droop nose in the form of electrical signals to the air intake control system, weather radar, air data computer and visual indication. The unit, which is secured to the floor with six bolts, contains ADC potentiometers, weather radar synchros and nose position indication microswitches together with the gear trains through which they are actuated by a common input lever. This lever extends through the equipment bay floor and is connected to a link rod on the droop nose hinge arm. As the nose raises or lowers the input lever moves accordingly to operate the unit. In case of link rod fracture, the input lever is spring-loaded to return to the up (O deg) position to prevent high incidence signals; a fail-safe box will contain the rod.

Nose Emergency Release System
If both the normal and the standby systems fail, the droop nose can be released from its up Locks using the emergency release system. This comprises of a mechanical linkage of struts and levers connecting the nose up-lock mechanism with an operating handle on the pilots centre console.Operation of the handle will release both up-locks simultaneously and actuate two microswitches (M21 and M54) fitted to the forward face of the pressure bulkhead, to isolate the system electrics. When not in use the handle, which is hinged at its base, is stowed against the side of the console and is secured with a pip-pin.
Pictures of the Four Nose and Visor Positions

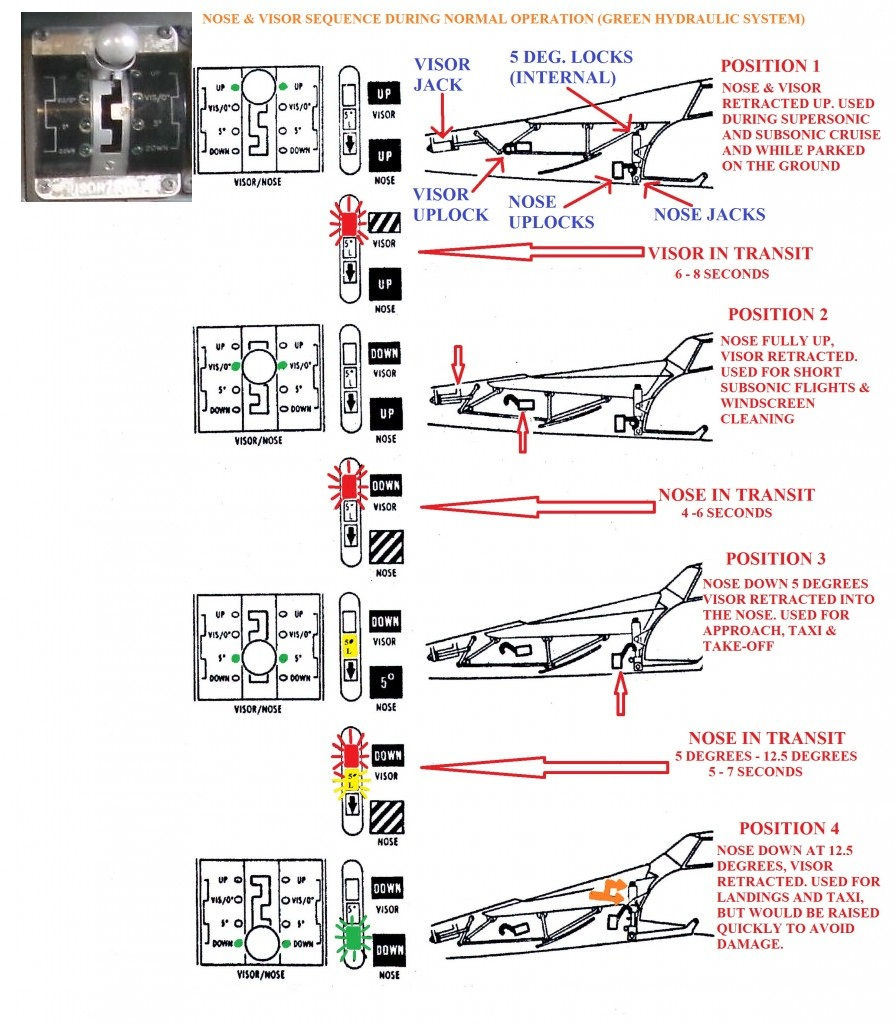
Above: POSITION 1: Nose and visor fully up: – Used for supersonic flight, and while parked on the ground

Above: POSITION 2: Nose fully up, Visor retracted: – Used for short subsonic cruise, windscreen cleaning

Above: POSITION 3: Nose down at 5 degrees Visor retracted: – Used for take- off and taxi

Above: POSITION 4: Nose down at 12.5 degrees up, Visor retracted: – Used for landings and taxi
Operating the Nose and Visor
The visor has two positions: Up and down- Up position is maintained by a mechanical uplock- Down position is maintained by hydraulic pressure and mechanical springs
The nose has three positions:
UP, down at 5 deg. & down at 12.5 deg.-
Up is maintained by mechanical uplock-
5 deg. down position is maintained by 2 jacks internal locks-
Down position is maintained by hydraulic pressure, aerodynamic loads and nose weight.
This gives 4 normal configurations of nose/visor ( See the pictures above):
Visor up, nose up.
Visor down, nose up.
Visor down, nose down 5 deg.
Visor down, nose down 12.5 deg.
There are three different operational modes:Normal, Standby & Emergency

Normal System Operation
Green hydraulic power supplies- a single jack which operates the visor- a pair of jacks working in parallel to operate the nose.It also supplies power to release visor and nose uplocks.
When the nose and visor are up, (nose and visor selector switch at the UP position) all solenoids controlling the hydraulic selector valves are de-energized and all the pipes in the visor and droop nose system are connected to green system return. The NOSE and the VISOR magnetic indicators are energized via the nose transmitter unit nose ‘up’ microswitch and the visor ‘up’ microswitch respectively to show UP. All three captions are extinguished.
Setting the selector switch to VIS/O deg. energizes the down solenoid of the visor selector valve to hydraulically release and lower the visor. It also energizes the 5 deg. and 12 1/2 deg. cylinders selector valve solenoids of the actuator jacks to pressurize the jacks to hold the nose in its up Locks to remove the weight from the up-lock hooks.
When the visor up-lock opens, microswitch M32 energizes the up-lock relay which illuminates the red unlocked caption. As the visor moves away from the up-lock, microswitch M37 energizes the visor up relay to cancel UP on the visor magnetic indicator.
When the visor is down, the visor ‘down’ microswitches M34 and M60 extinguish the red caption, and this energise the VISOR magnetic indicator to show DOWN. The visor remains pressurized down.Setting the selector switch to 5 deg. energizes the nose up-locks selector valve solenoid to hydraulically release the up-locks. Electrical supplies to the 5 deg. cylinder solenoids are maintained via the nose up-lock microswitches until the nose is released thereby preventing snatch on the up Locks. The 5 deg. cylinder solenoids are then de-energized and the nose is lowered to 5 deg. When the nose up locks open, the red caption is illuminated via the nose up-locks microswitches and the nose transmitter unit. When the nose reaches 5 deg. the transmitter unit extinguishes the caption and energizes the NOSE magnetic indicator to show 5 deg.
Selection of DOWN on the selector switch de-energizes the 12 1/2 deg. cylinder solenoids to hydraulically release the collet locks and lower the nose to 12 1/2 deg. The nose is retained in this position by hydraulic pressure. As the nose is released from the collet locks, the collet locks microswitches illuminate the 5 deg. L and the red captions.When the nose is fully down, the nose transmitter unit extinguishes the red and 5 deg. L captions, illuminates the green arrow caption and energizes the NOSE magnetic indicator to show DOWN. To raise the nose, the selector switch is moved to 5 deg. this energizes the 12 1/2 deg. cylinder selector solenoids to hydraulically raise the nose to the 5 deg. position.
When the 12 1/2 deg. cylinders have reached the end of their travel, they are automatically engaged by the nose actuator collet locks. As the nose rises the nose transmitter unit extinguishes the green arrow caption, and cancels the DOWN indication on the NOSE magnetic indicator and illuminates the red and 5 deg. L captions. When the nose reaches 5 deg. and engages into the collet locks, the nose transmitter unit extinguishes the red and 5 deg. L captions and energizes the NOSE magnetic indicator to show 5 deg.
NOTE:Except when the nose is down, operation of either collet lock switch will illuminate the 5 deg. L caption and it will also illuminate the red caption when the nose is at 5 deg.
The nose is raised to its ‘up’ position by selecting VIS/O deg. This energizes the 5 deg. cylinder selector solenoids; system pressure then raises the nose, which engages automatically in its up-locks. As the nose rises, the red caption is illuminated by the nose transmitter unit. When the nose is up, the red caption is extinguished by the nose up-locks microswitches and the nose transmitter unit energizes the magnetic indicator to show UP.
To raise the visor the selector switch is set to UP.This:
(1) De-energizes the 5 deg. cylinder selector solenoids on the nose actuator and the visor selector valve ‘down’ solenoid.
(2) Energizes the visor selector valve ‘UP’ Solenoid, to repressurize the visor down circuit and the droop nose jacks and to hydraulically raise the visor.
The ‘up’ solenoid will energize only if the nose up-locks are engaged and the windscreen wipers (parked) relays are energized. If the relays fail and prevent the visor from being raised, the relays can be by-passed by the WIPERS/O/RIDE switch after first ensuring that the wipers are in the parked position.
To ensure that the collet Locks remain engaged when hydraulic pressure is removed from the nose actuator, the 12 1/2 deg. cylinder selector solenoids remain energized until completion of the visor ‘up’ movement. When the visor begins to rise the red caption illuminates via the visor ‘down’ microswitch.
The visor is guided in its final upward movement by its roller and hook assemblies engaging with the location fitting on the windshield.
When the visor is engaged in its up-lock the visor UP microswitch energizes the VISOR magnetic indicator to show UP, and de-energizes one of the 12 1/2 deg. cylinder solenoids: the visor up-Lock microswitch de-energizes the visor up-lock relay to extinguish the red caption and de-energize the other 12 1/2 deg. cylinder solenoid.


NOTE:
The windscreen wipers must not be operated when the visor is up.
Standby System Operation
The yellow system is available only for lowering the visor and nose.
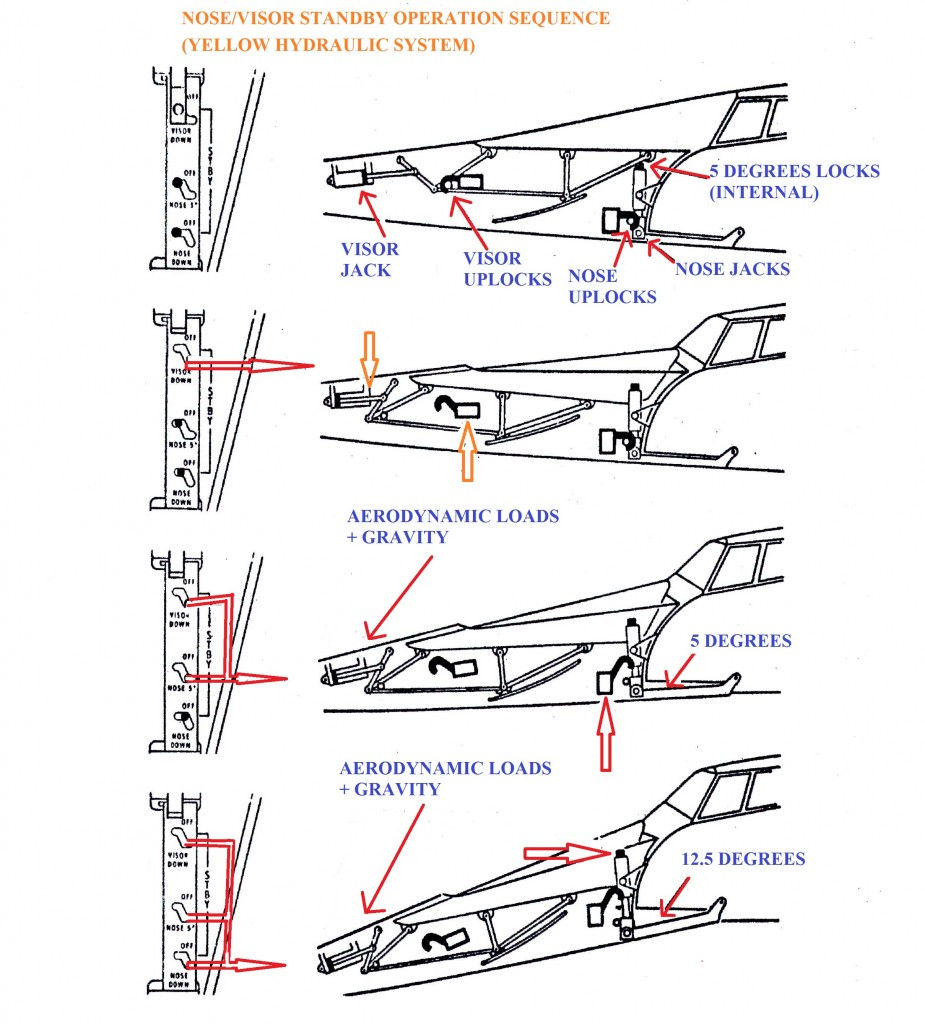
This standby system unlocks and lowers the visor through the normal jacks but only releases the locks of the nose thus allowing its own weight and aerodynamic loads to lower it to the 5 degrees down or 12.5 degrees positions.
Yellow hydraulic system.
When the visor standby selector switch is set to VISOR DOWN:
(1) The normal control system is isolated.
(2) The visor standby lower selector valve solenoid is energised to release and lower the visor
(3) The NOSE 5 deg. and the NOSE 12 1/2 deg. standby switches are armed.
When the visor up-lock opens, microswitch M32 energizes the up lock relay which illuminates the red unlocked caption. As the visor moves away from the up-lock, microswitch M37 energizes the visor up relay to cancel the UP indication on the VISOR magnetic indicator.
When the visor is fully lowered, the visor DOWN microswitch extinguishes the red caption and energizes the VISOR magnetic indicator to show DOWN. Lowering the visor using the standby system results in a quantity of hydraulic fluid, equal in volume to the visor jack rod, being transferred from the green to the yellow system. The level’s of the green and the yellow system hydraulic reservoirs must be rebalanced after each standby lowering.
Selection of the nose 5 deg. standby switch to NOSE 5 deg. energizes the nose up-locks standby selector valve solenoid to hydraulically release the nose up-locks using the yellow system. The nose will then free fall to the 5 deg. position. Magnetic indicator and caption indication will take effect as for the normal system.
The nose is fully lowered by setting the standby nose selector switch to NOSE 12 1/2 deg. This isolates the 12 1/2 deg. cylinder selector valves by energizing the collet locks standby selector valve to hydraulically release the collet locks and permit the nose to free fall to the 12position.
Indication will be as for the normal system.

Emergency Operation
Should there be a complete failure of the green and yellow hydraulic systems, the nose uplocks can be released mechanically thereby allowing the nose to fall freely to the 5 degrees position. The downward movement of the nose automatically releases the visor uplock and the visor is then lowered by gravitational and aerodynamic loads assisted by spring action.To operate the emergency release system, the release lever is first pulled outward by its pip-pin ring to hinge it clear of its stowed position and is then pulled upward. It is retained in this position automatically by a latch. This will operate the linkage to release the nose up-locks and will actuate the two microswitches to electrically isolate the normal and standby systems; with the exception of one feed to the right hand nose jack 12 1/2 deg. selector, this is to ensure that at least one collet lock is maintained. The nose will then free fall to the 5 deg. position under its own weight and aerodynamic pressure and as it hinges downwards a cam fitting on the fuselage bulkhead trips the visor emergency release system to release the visor up-lock. The visor aided by the spring assistor mechanism free falls to the down position.

NOSE & VISOR OPERATING LIMITATIONS
Nose/VisorVisor down, or operating.
Nose down 5 degrees, or operating between the UP & 5 degrees positions: ~ 325 kt/M = 0.8
Nose down or operating between 5 degrees and DOWN: ~ 270 kt / 20,000ft
Nose and Visor up but unlocked:~ 325 kt/M = 0.95
The nose must be in the 5 degrees down position for take-off.
Below 250 kt the visor must be in the DOWN position with the nose at 5 degrees or lower.
Nose and/or visor operation must not be made below 500ft above the terrain.
Parking
To avoid the possibility of water being trapped in the manometric system, the aircraft must not be parked with the nose in the DOWN (12.5 degrees) position.